
An Introduction to Whirl
Spin to win bonus points in this casino-inspired self-paced game
Introduce content with Slides or import your PPT Slides
Question types: Multiple Choice, Select All That Apply, Poll, Open-Ended, and Image Map
Send students a link or upload to your LMS
Detailed results saved for each self-paced session

When Whirl is first launched give your Whirl session a name. Whirl is a self-paced session only.
Adding Content
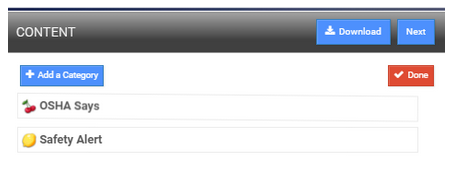
You can have up to 10 Categories with 1- 10 questions each. The categories can be played sequentially or can be randomized.
Question Types
You can have up to 5 question types.

A Breakdown of Each Type of Content Available in WHIRL
Slides:
This is the default selection. The Slides is unique to TALLY and SPARK. This allows you to have a PowerPoint like presentation with the interactive features that Spark offers. To add Slides (image) click on the blue Add PPT Slide button to the right. You will also have the option to Add Audio. To learn more about saving your PowerPoint presentation as slides visit here. When you use Slide mode, during your presentation any image will go to full screen just like if you were using PowerPoint.
Multiple Choice: This is a standard option throughout the BRAVOZONE templates. Where you have a question and option of 2-5 answers. You then select what the correct answer is. Like any question format, you have the option to include images and audio as part of your questions.
True Or False: When selected you are given a place to ask your question and then you select True or False in the Answer selection area below.
Select All That Apply: You can select as many correct answers as you want. Keep in mind that if you have for example 3 correct answers, your participants will need to select all 3 answers to get it correct. You may want to indicate this in your question. i.e. What 3 personal protection items are you required to don when entering the packaging area?
Poll: There is no right or wrong answers. This option is not much different than Select All That Apply except for you have the option under Settings under Response percentage chart, to show the response in a Pie or Donut chart.
Open Ended: This is a feature that allows you to ask a question and get a response back. This will show up in the reports for the player.
Image Map: This allows the user to choose an area on the image as an answer. The use of optional Hotspots allows you to choose specific regions of an image as the answer. There are a few options on how to use a Hotspot. Click to Watch video Tutorial on Image Maps.
NoHotspot: After inserting an image, you can choose to not use a Hotspot. For example, you could insert an image of the United States with a caption “Click on the map where you live”. When presented in presentation mode. The participant will read the question (Or hear it) and then click on their location. This will then show during your presentation. Under Settings¸ you have the option to turn on Show participant names for pins on image map, to display names of each participant’s location on the map. By default, names are hidden. In the example below a picture of the US was brought into the Image Map

Single answer Hotspot:
If you are going to have only one correct location, then only insert one Hotspot. For example, if my question is “What is the largest state in the US?” Then you would just put a Hotspot on Alaska. If a participant does not answer or chooses any location other than the hotspot they will get the question wrong.
Multiple Hotspots:
You have the option to add more than one correct Hotspot in an image. For example, for the image below the question is “What are the 2 largest states in the US? Click submit when finished.” The image below shows the Image Map with 2 states selected and the question that will instruct the participants what the question is. Since there are 2 Hotspots the participants will need to select Alaska and Texas to get the answer correct. They will only be allowed to select 2 states since that is all the Hotspots that were selected in the Image Map.


Edit Content Options
Preview and Summary Slides
Like other platform within the BRAVOZONE you have options of using Preview and Summary slides to add additional teaching points or additional information the users may need to answer a question. This includes videos, audio, text, and images (including PowerPoint slides).
Difference Between Add Media and Add PPT Slide
The difference between using the Add Media option versus the Slide option under Type, is that when you insert images using the Slide option the image will automatically go to full screen. If inserted as an image, you as the presenter will need to select on the image to go to full screen.

Optional Settings for Slides, Questions, Etc.
Depending on what option you choose under Edit Content, you have different Setting options depending of the Type you select for your slide. The option includes items like:
Points Value, change the value of the points (Open ended, Multiple Choice, True or False, Select all that Apply, Poll, Image Map)
Show participant names for pins on image map (Image map)
Category Options
When you hover over a category name, you will see options to Open or close the category. This allows you if you have many categories conceal the categories content in the builder. You can also edit the category or delete it.

Options to Edit Category
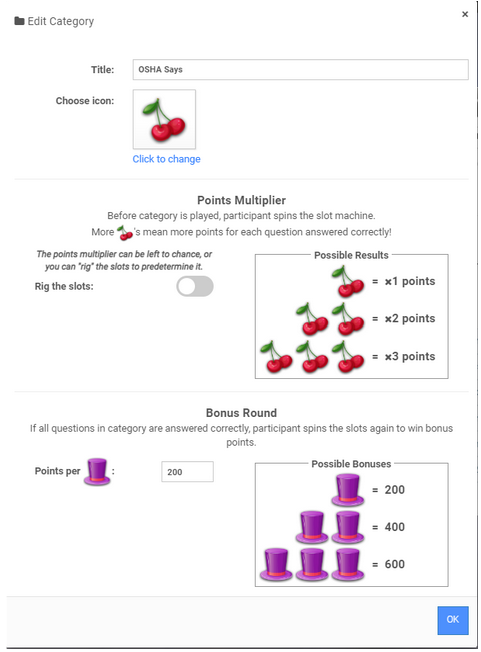
When editing the Category, you have options to change the name and Icon including adding your own.
Rig The Slots
By default this will be randomized, however you can turn this off. Why would you want to turn this off? Everyone would then be on the same points assignment and would simply be awarded a flat score for questions answered correctly. When left off, you could have someone who got more questions right but loose the session to others because they got more points awarded. Reports will report both the overall Score in percentages as well as points one in the game.
When you turn on Rig the slots you can click on the Award single points


Reorder your Categories
When you click on Reorder Categories your categories will condense down and shake. Then you can simply reorder your categories and click on Done.

Customize Graphics – Graphics
Starter Template
Background:
You have 4 default backgrounds to choose from. To change the background, go under Customize and click on Change Background Image.
Background color: You can change the color of the header and footer of your session by a) either manually clicking on in the chart a different color or changing the Color Hex Collar Code.
Load Custom Logo:
You can use .PNG files to preserve the transparency or JPEG or Gif formats. The ideal size is 3.472 x 1.042 inches or 250 x 75 Pixels. The logo will show up to the left of the session title.
Font Style: There is a selection of different fonts to use for your session. This is a Global font that will show throughout your session.
Customize the Introduction Screen:
This allows you to change the Text that appear in the black center with Sample Text written in there. You will have to proof your session to see how this looks for guidance.
Customize the Closing Screen:
When your session is over your users will be shown the winner and top scores. Above your team or individual scores will appear the Text TEAM (Team name) WINS. You can change the text that appears to anything you want. i.e. “And the TOP SCORE is” The custom image you place here will sit behind the text that appears.
Content
After clicking on Click to add content in the Content section you will be given 7 choices or how you want to display your content. To see the choices, look in the drop-down menu under Type.
Adjust Play Options

General
In this section you can choose the percent to pass and randomize your questions. If you choose this option, you will randomize all your content, this includes questions, slides, etc.
Creating a SCORM package in SPARK
Since SPARK is self-paced you can easily create a SCORM package to upload to your LMS. Go to Options and go the section at the top LMS/SCORM and click on Download SCORM.
Question Timer
Whirl has an option of a timer. By default, the time is turned off. If you turn the timer on it will be on for every question. You have the option of setting the timer for 10, 20, 30, 40, of 60 seconds. You can also choose to have the points diminish for each question as the time counts down.
Quiz Text
You have the option to customize any of the Quiz Text that appears when the Quiz is in play.
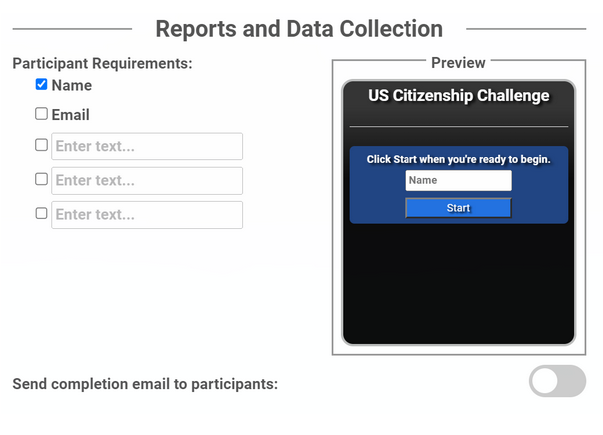
Reports and Data Collection
You can customize the Participant sign in options here. You can also choose to Send completion email to participants after they complete a session. You would need to either require them to create an account or select the Email to require them to provide a email. These are the fields a player will be asked before a session begin you can customize three of these fields or even ask a question. You can use them all or no fields at all.
Publish Page
Elearning Link
This is the link you can provide your attendees to play your session.
Content Preview Link
This is the link you can provide to others to preview your session. This will just show your content, and is not a “play” link.
Description to help users find your Quiz in Shared Content
This is additional information you can add to your Quiz that resides under the My Content section that displays all your templates you have created. You will see in the image below a description that was inserted into this session.

Show this Session in Shared Content
If you have other instructors or higher in your organization you can make sessions available to them under shared content.
What is the Publish Feature in Whirl?
The Publish feature is identical in Whirl as it is with the Quiz templates found in the BRAVOZONE.
Make an unpublished copy of this Quiz (session)
As the title indicates this will make a copy of your session.
Show in Shared Content
This will show up in your shared content for others authorized users to see your content.
Participant sign-requirements
The default is No sign in-required.
Sign-in required will require the attendee to create an account to play.
Choose who can participate. This option is only for people that have already created an account. If you select this, you will be provided a list of names and groups you can assign the session to.
The last is Only you can play.
Allow new Participant to register
If you deselect this, only current users in your organization can play.
Limit how many times each registered student can play
This will only apply when you have Sign-in required selected.
Who can edit this Quiz (Session)
You have three options, only me (you), All eligible users in your organization, or you can allow a specific user or users to edit the session.